Showing posts with label DIY. Show all posts

Saturday, September 5, 2015

Felt bows

I've been trying my hand at a few felt bows lately. I love how bows look on my little one, and they keep her bangs off her eyes, so that's an added plus. 

I followed a simple tutorial I found at Ruffles and Stuff. I like that all you really need are scissors, a ruler and a glue gun. 

You can find the easy to follow instructions on her website. Disney recommends 1.5" for the small piece that wraps around the middle, but I found that to be too small and had to stretch out my felt to about 2".

I'm pretty happy with this style. I might try it again in green. 


Sunday, July 5, 2015

Peg Dolls

A lot has gone on in the last year since my daughter was born and even though I had every intention to keep up with the blog, I was barely able to keep up with getting dressed in the morning haha. Giuliana turned the big ONE last April, and we had lots of fun. I'll share some of the bday decor later.
The other day I was scrolling through Instagram and saw a picture of a friend's little girl playing with peg dolls. OMG! Where have you been all my liiife? I decided I Giuliana needed to have these, but was sad to find they were a little pricey. They're handmade and making the real deal is truly an art, so I get it, but I couldn't justify spending $40+ on peg dolls.
SO, as usual I thought to myself, I could probably do a simpler version of that, and turns out I can!
I bought the pegs at Michaels, but you can get them for cheaper on Amazon. I just wanted to get a couple to see if I could actually pull it off.


I drew the hair and dresses on with pencil first and painted with regular acrylic paint and voila!


I was pretty nervous about making them, but I felt more confident as I went along.


Sunday, June 30, 2013

Glass knobs

I've been kind of obssesed with glass knobs for a while. They're just impossible to find here in Costa Rica. However, one of the few perks of my SH (saint husband) traveling so much lately, is that he can find the impossible :o)
The before wasn't bad, I just wasn't crazy about how the knobs got lost against all the dark wood.


They were beautiful and I'm keeping them for some other project later on, but the new ones are just how I imagined they would be. We got them on sale at Hobby Lobby. I just love them!


This was literally a five-minute fix and I just cannot get over the difference.


These glass knobs really pop against the dark wood and they give it a more sophisticated look.


Monday, May 27, 2013

Tipsy flower pot tower

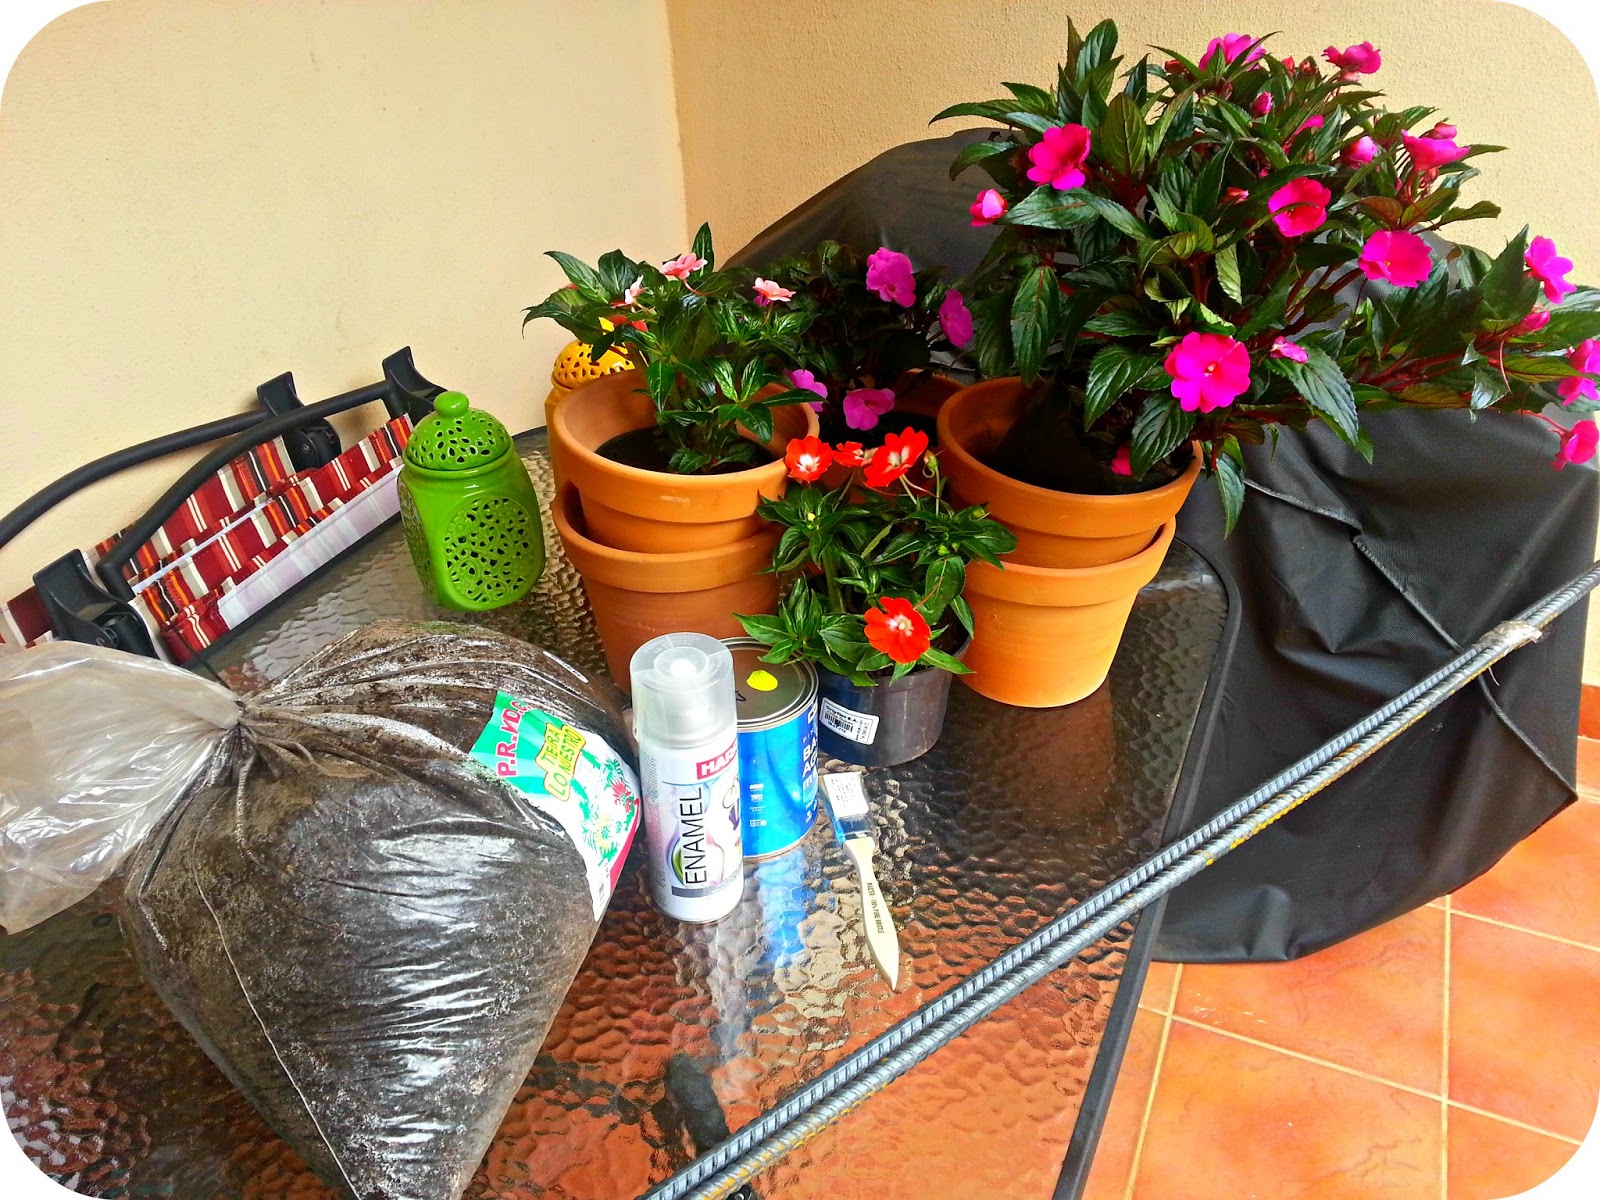
Lately I've been running across lots of fun gardening projects and it so happens that the rainy season is upon us here in Costa Rica, so this project was just meant to be. Since we bought our house, I've been slowly but surely getting more and more into gardening and plants and this just seemed like such a fun way to display them.


The materials I used were clay pots, a re-rod (rebar), paint, a glossy finish sealer, and some plants. I think it could've been easier to spray paint the pots, but I couldn't find the right color at EPA. Of course I could've tried other hardware stores, but I didn't :) Instead, I bought Protecto Green Apple and had to apply three generous coats to each pot and then seal them with a glossy finish. 


The process was fairly simple. First, my saint husband helped me drive a 1.60m/63¨ re-rod (rebar) into the soil 60cm/2ft. Then, we placed a bigger round clay pot at the base, threading the re-rod through the drainage hole. You have to fill it with dirt so the next pot has something to sit on.  And then I threaded onto the rod and tilted the other pots on opposite sides of each other to distribute the weight evenly. Finally, I planted each china (impatients) to add more color.

This project was labor intensive and took a while to complete. I want to say you'll need an entire weekend to complete it, though if you spray paint the pots it'll probably take even less. I'm really satisfied with the final result, though my husband is the biggest fan. I don't think I've ever made anything he liked quite so much as this. I specially like how the color of the pots really pops (I was nervous of them looking neon green for a while).

So there you have it! A fun alternative to a regular flower pot stand. 


Tuesday, May 7, 2013

The perfect picture frames

I'm on a quest! Finding the perfect frames has proven to be a challenge. Why do I always want what I can't have? ha! I've been trying to find some frames to complete the wall decal project and sadly, I'm still searching. I found three frames I really liked at Aliss. They were also 20% off so that was nice. I want two more to add some variety. 


I'd like to find a couple more oval picture frames, possibly in the same shade as these. I wasn't intentionally trying to find them all in this color, but sometimes you just got to go with the flow. I considered spray painting them black, but I think I like them better in cream.


Left: blissandbloom.co.uk Right: www.bombayduck.com

I'm not sure whether to try to find something simple or more ornate. I have to think about the possibilities. What would you do?

Friday, April 26, 2013

I dream of trees - Part 1

I love my house, but when we moved in, it became pretty obvious that there was a trouble spot. There's this wall between the bedrooms and it's always felt like some sort of focal wall because you can see it from pretty much every angle in the house. I hated that it looked so large and bare. I honestly did not even know where to start. I thought some sort of artwork would be great, but the size of the wall (2.5*2.5 meters/8*8 feet) was a problem. I would've needed to get a single huge canvas or multiple coordinating pictures, but I remained unconvinced. I wanted it to look full without really adding furniture because it functions as a hall. 

Then I started daydreaming about trees one day. Trees have got to be one of my favorite natural element in the world. They're just so big and free flowing. I figured some sort of tree art work could be the solution and a wall decal just felt right. Finding the right one wasn't easy, I must've looked at hundreds of ideas on Pinterest and Google. Then, as usual, I just fell in love. 


This was it! I found a local company that customizes decals and the rest is history.


These are only a few pictures of the process. It was time consuming and it's a two-person project. But even though we had no experience, it was a relatively simple process. You have to be very careful and thorough. There were 15 pieces that we had to match exactly. And we stuck the leaves one by one onto the wall. The whole thing took about 4 hours. 


I loved the final result. Now we're onto finding the perfect frames to add to it. I want it to be a sort of family tree with our family photos. I'm thinking a max of five frames so it doesn't look too busy. 


Do you dream of trees? Or is it just me? ;)

Wednesday, April 10, 2013

My dream topiary

This project is an oldie. I made it about a year ago, but to this day, it's one of my favorite decor pieces. This whole topiary obsession began a few years ago and I even had topiaries for my own wedding.

My wedding centerpieces

But my love for topiaries didn't stop there, and as I type this I realize it might not ever completely go away :) There is this spot in my house where I've always wanted to put a plant. Let's just say it is a death zone. No plant has ever survived and I just started feeling bad for the poor innocent plants and stopped trying. But I wanted a little bit of green in that area, so a green topiary seemed like the natural thing to do.


One of my biggest decorating challenges is that I don't live in the US and in my tropical rainforest world, most of the time I have to improvise. My inspiration came from another blog Scissors & Spatulas, and in her tutorial, Jen just bought the topiaries. As most of my projects, this one started with a ray of light from heaven pointing me in the direction of the right materials. I found the artificial baby tears at my favorite Chinese store and the whole thing just came to life.

Topiaries from Scissors & Spatulas
scissorsandspatulas.com/2011/02/ballard-inspired-boxwood-topiaries.html 

My saint husband was skeptical to say the least. We had just moved into our new house and I was finally starting to let my creative juices flow. But I was on a mission! So I bought the artificial baby tears, a styrofoam ball, green paint, cold silicone glue, and used some BBQ sticks I had home. 


First, I painted the ball green, though any kind of dark color will do. You just want to make sure the white ball is not showing through the greenery. I used the BBQ sticks to not get paint all over my hands and help it dry more evenly.

Once it was completely dry, I started the gluing process. Though I used cold silicone glue to do this because I absolutely hate hot silicone glue, I think I might recommend using the hot instead. The process is going to be faster. 


For the pot, I just used the base of a candlestick I already had. 


I loved the way it looked and the final product even more. The total cost for this project was about $7, a bargain compared with store-bought topiaries that range between $30-40 or even more if you go to high-end stores. 

Wednesday, April 3, 2013

What to do with my basket?

The lonely basket when we first moved in
I got a lovely basket for my wedding shower. I think my grandma originally wanted me to use it as a towel display in my bathroom, but the basket was just too big for the space. I struggled with what to do for the longest time. Then I got the idea of temporarily putting it in our living room, but it just looked so bare. It didn't have a purpose and I feared it was just going to sit unused forever. 

 Then one day I was struck with inspiration from an ad I saw on one of my favorite blogs www.thriftydecorchick.blogspot.com/.
Ad from www.decorsteals.com
The basket wasn't the same and I initially thought of hydrangeas. I pictured beautiful white, puffy hydrangeas.
Hydrangea basket from www.rtfactflowers.co.uk
I don't know why, but it seems to me that every time I come up with an idea, shop owners around the country decide to hide their products from me. For real, I think I have looked for the last six months and the best I was able to come up with was a pink, totally fake-looking hydrangea. I know the flowers I want exist because my grandma has some lovely hydrangeas, but I think she paid something like $15 per flower. She only needed a few for her house, and I would need at least ten for my basket ($$$). Anyhow, the store she got them from has been out of stock for months.

Then last week, I was at one of my favorite Chinese stores and a ray of light from heaven pointed me in the direction of some lilacs. Immediately my heart started racing. All I could think of was the original basket with the lilacs I'd seen a few months ago and I was sold. 


I could not believe how great they looked. I sent a picture to my husband who thought they were real, and I completely agree with him. Unless you touch them, these don't look like artificial flowers. They were only about a dollar per bunch and these are bushy bunches, so the project was soo cheap to complete.

I think I still dream of finding my dream hydrangeas, but I love the look of these lilacs. Don't you agree?